Minimal macOS menu bar extra's app with SwiftUI
macOS SwiftUI menu bar extra Estimated reading time: 9 minutesCreating a minimal utility app for macOS is quite often needs. Such an app is always available in the menu bar and can perform some operation with just a few clicks or some shortcut can show information instantly.
Good catch from @liemeldert -
I just wanted to bring your attention to the addition of MenuBarExtras into native SwiftUI. Here’s their docs
so please also refer to this doc.
When I facing some problem, that requires the same and same activities, I always try to automate it or at least minimize it. Menu bar extra’s app - may be a perfect solution for this.
“Menu Bar Extras” is an official name for icons in the menu bar. Often it’s called status-bar items, but this is not an official name.
SwiftUI allows us to build apps much faster, so we can use it for this purpose as well.
Check this web resource for a curated list of menu bar extra’s
The way
One of the reasons why I love programming is that because u can solve one task in at least 2 ways. Making menu bar extra’s is not an exception. The most popular variant is:
I personally preferer a way that uses NSMenu - as for me it looks and feels much better. Apple also recommends this “Display a menu—not a popover—when the user clicks your menu bar extra”.
If u are wondering how u can achieve the same with
NSPopover, check for example this article and if u need a pure AppKit implementation check this one
SwiftUI implementation
Unfortunately, we can’t create the macOS bar extra’s app without AppKit, by using only SwiftUI. So, we should use NSMenu and NSMenuItem.
I won’t cover best practices and recommendations from Apple to not rely on menu bar items and to provide an option to allow users to decide show or not menu bar icons, etc. Instead, I just cover how to create a minimal app.
Configure menu
Let’s define our menu structure:
private func createMenu() {
if let statusBarButton = statusItem.button {
statusBarButton.image = NSImage(
systemSymbolName: "hammer",
accessibilityDescription: nil
)
let groupMenuItem = NSMenuItem()
groupMenuItem.title = "Group"
let groupDetailsMenuItem = NSMenuItem()
groupDetailsMenuItem.view = mainView
let groupSubmenu = NSMenu()
groupSubmenu.addItem(groupDetailsMenuItem)
let mainMenu = NSMenu()
mainMenu.addItem(groupMenuItem)
mainMenu.setSubmenu(groupSubmenu, for: groupMenuItem)
let secondMenuItem = NSMenuItem()
secondMenuItem.title = "Another item"
let secondSubMenuItem = NSMenuItem()
secondSubMenuItem.title = "SubItem"
secondSubMenuItem.target = actionHandler
secondSubMenuItem.action = #selector(ActionHandler.onItemClick(_:))
let secondSubMenu = NSMenu()
secondSubMenu.addItem(secondSubMenuItem)
mainMenu.addItem(secondMenuItem)
mainMenu.setSubmenu(secondSubMenu, for: secondMenuItem)
let rootItem = NSMenuItem()
rootItem.title = "One more action"
rootItem.target = actionHandler
rootItem.action = #selector(ActionHandler.rootAction(_:))
mainMenu.addItem(rootItem)
statusItem.menu = mainMenu
}
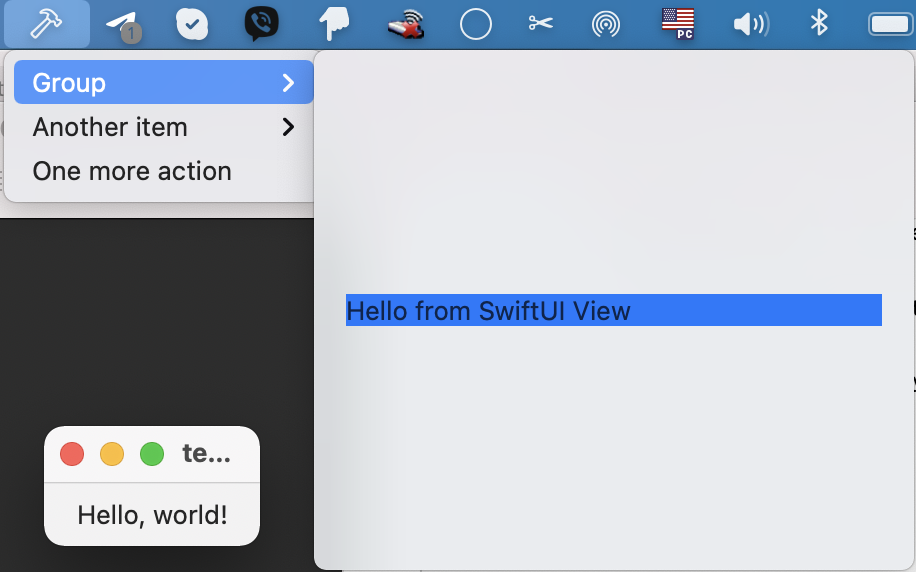
}This will create for use structure within few submenus, custom SwiftUI view, and actions.
As soon as u retain
NSStatusItem, a menu will become available, if u release the variable - then a menu will disappear.
Retain menu
The next step - is to define a proper point to set the menu and to configure NSStatusBar and NSStatusItem.
If u put it before the app is ready for this (before all parts of the app initialized and ready), u can get an assertion like
“Assertion failed: (CGAtomicGet(&is_initialized)), function CGSConnectionByID, file /AppleInternal/BuildRoot/Library/Caches/com.apple.xbs/Sources/SkyLight/SkyLight-570.7/SkyLight/Services/Connection/CGSConnection.mm, line 133.”
The correct place - is when the application did finish launch, but within SwiftUI pure app and @main attribute, this is not available anymore. The solution for this - is to use NSApplicationDelegateAdaptor - “a property wrapper that is used in App to provide a delegate from AppKit”:
@main
struct testMenuBarExtraApp: App {

  @NSApplicationDelegateAdaptor(AppDelegate.self)
  private var appDelegate

  var body: some Scene {
    WindowGroup {
      ContentView()
    }
  }
}
then, we can create AppDelegate, and configure everything thereby using applicationDidFinishLaunching(_:):
import Foundation
import AppKit
import SwiftUI
final class AppDelegate: NSObject, NSApplicationDelegate {
private var menuExtrasConfigurator: MacExtrasConfigurator?
final private class MacExtrasConfigurator: NSObject {
private var statusBar: NSStatusBar
private var statusItem: NSStatusItem
private var mainView: NSView
private struct MenuView: View {
var body: some View {
HStack {
Text("Hello from SwiftUI View")
Spacer()
}
.background(Color.blue)
.padding()
}
}
// MARK: - Lifecycle
override init() {
statusBar = NSStatusBar.system
statusItem = statusBar.statusItem(withLength: NSStatusItem.squareLength)
mainView = NSHostingView(rootView: MenuView())
mainView.frame = NSRect(x: 0, y: 0, width: 300, height: 250)
super.init()
createMenu()
//
}
// MARK: - Private
// MARK: - MenuConfig
private func createMenu() {
if let statusBarButton = statusItem.button {
statusBarButton.image = NSImage(
systemSymbolName: "hammer",
accessibilityDescription: nil
)
let groupMenuItem = NSMenuItem()
groupMenuItem.title = "Group"
let groupDetailsMenuItem = NSMenuItem()
groupDetailsMenuItem.view = mainView
let groupSubmenu = NSMenu()
groupSubmenu.addItem(groupDetailsMenuItem)
let mainMenu = NSMenu()
mainMenu.addItem(groupMenuItem)
mainMenu.setSubmenu(groupSubmenu, for: groupMenuItem)
let secondMenuItem = NSMenuItem()
secondMenuItem.title = "Another item"
let secondSubMenuItem = NSMenuItem()
secondSubMenuItem.title = "SubItem"
secondSubMenuItem.target = self
secondSubMenuItem.action = #selector(Self.onItemClick(_:))
let secondSubMenu = NSMenu()
secondSubMenu.addItem(secondSubMenuItem)
mainMenu.addItem(secondMenuItem)
mainMenu.setSubmenu(secondSubMenu, for: secondMenuItem)
let rootItem = NSMenuItem()
rootItem.title = "One more action"
rootItem.target = self
rootItem.action = #selector(Self.rootAction(_:))
mainMenu.addItem(rootItem)
statusItem.menu = mainMenu
}
}
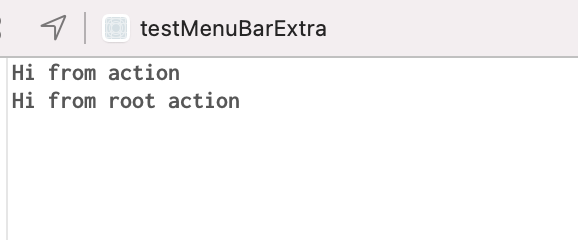
// MARK: - Actions
@objc private func onItemClick(_ sender: Any?) {
print("Hi from action")
}
@objc private func rootAction(_ sender: Any?) {
print("Hi from root action")
}
}
// MARK: - NSApplicationDelegate
func applicationDidFinishLaunching(_ notification: Notification) {
menuExtrasConfigurator = .init()
}
}Result:
If u check menu actions - all also works, as we expect:
Hide unnecessary view
I guess u already noted, that ContentView is also displayed, but this is not what we want.
The next task - is to get rid of UI, that is displayed on the app star, thus we want to get the menu bar app. To do so, we should tell to macOS, that we would like to have a background application. We can achieve this by modifying Info.plist and adding a special flag - LSUIElement.
<key>LSUIElement</key>
<true/>
You can find even more spesific keys for
Info.plisthere.In really - we can use this flag, but this isn’t something that was created especially for the described purpose. As was mention by Apple - an agent is an application without UI that works in bg. So, sometimes it’s better to perform process transformation instead of simply putting a key into
Info.plist:
// into agent
ProcessSerialNumber processID = { 0, kCurrentProcess };
OSStatus status = TransformProcessType(&psn, kProcessTransformToUIElementApplication);
// and back
ProcessSerialNumber processID = { 0, kCurrentProcess };
OSStatus status = TransformProcessType(&psn, kProcessTransformToForegroundApplication);
Now, run u’r app - u can see, that icon in the dock is not appears anymore, but the menu icon is still available and fully functional.
To make things even better, we can replace the content of @SceneBuilder in type annotated with @main attribute with :
WindowGroup {
  EmptyView()
    .frame(width: .zero)
}
If u not change the frame of the EmptyView, u will see a window within the default frame. I guess this is some point for improvement in SwiftUI and this may be changed in the future.
or
Settings {
  EmptyView()
}
if u select app and press
CMD+,, Preferences window will be shown. This is downside of the second approach.

Both variants are not ideal and have their own +/-. I Hope, this will be improved a bit in the next SwiftUI releases.
A great addition was added by @marc-medley (see comments) regarding LSUIElement:
If Info.plist is manually added and edited, then the project build settings needs to be updated to not use the GENERATE_INFOPLIST_FILE “Generated Info.plist File” AND to know where to find the manually added INFOPLIST_FILE "Info.plist File".

Open separate window
Often, we would like to display a window with extended actions on some of the menu buttons click. To do so in SwiftUI, we should define a few more Scene in @SceneBuilder in type with @mainannotations and use handlesExternalEvents(matching:). This modifier can create a new scene in your app:
WindowGroup {
EmptyView()
.frame(width: .zero)
}
WindowGroup("myScene") {
MyView()
.frame(width: 400, height: 600)
}
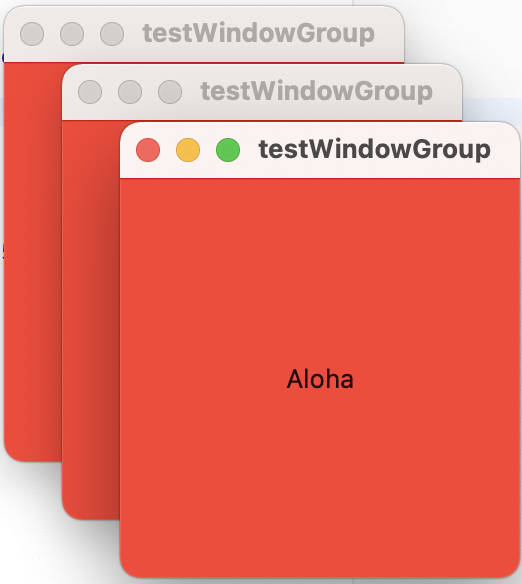
.handlesExternalEvents(matching: ["myScene"])Next step - define URLtype and call it using Environment OpenURLAction:
@Environment(\.openURL) var openURL
// later somewhere in the action

openURL(URL(string: "myApp://myScene")!)
Result - u can launch few same windows at same time:
If u need only single window - use
handlesExternalEvents(preferring:, allowing:). Check this SO post for more.
Pitfalls and limitation
Unexpected behavior
In my previous post about WindowGroup I already covered some issues related to menu bar extra’s app and WindowGroup, so I just copy-paste them below:
- sometimes selected scene is not shown (needs to click a few times on the button to make it workable)
- sometimes copy of menu-bar extras created (even if u create an
NSMenuonly for a dedicated window) - when u open a new scene - a dock item is shown (sometimes is not what we want
As a workaround to issues described above, I used NSWindow from AppKit:
let view = SerialPortConsoleView(viewModel: .init(store: store))
let controller = NSHostingController(rootView: view)
let window = NSWindow(contentViewController: controller)
window.styleMask = [.titled, .closable, .miniaturizable]
window.title = "Console \(port.bsdPath)"
let size = NSSize(width: 400, height: 600)
window.minSize = size
window.maxSize = size
window.setContentSize(size)
window.contentMinSize = size
window.contentMaxSize = size
window.makeKeyAndOrderFront(nil)
data sharing
To share data between scenes in scene builder u can use one of the next approaches:
- share viewModel object and hold reference in view marked with
@mainattribute. Note, that eachScenehas its state management machine (if I can name it like this). This means, that each @State and other similar propertyWrappers and attributes work independently. - use serialization and shared storage
Resources
- HIG - Menu Bar Extras
NSPopoverNSMenuNSStatusItemNSApplicationDelegateAdaptorLSUIElementhandlesExternalEvents(matching:)handlesExternalEvents(preferring:, allowing:)OpenURLAction- Tutorial: Add a Menu Bar Extra to a macOS App
- Building a macOS menu bar app is now easier than ever with SwiftUI.
- Transform
LSUIElementto foreground application - How to create status bar icon & menu with SwiftUI like in macOS Big Sur
- Creating a Standalone StatusItem Menu
- Technical Note TN2083 Daemons and Agents
- How do you show an
NSStatusBaritem AND hide the dock icon? - Apple forum discussion
- SO SwiftUI 2: the way to open view in new window
Share on: