100 + 1
swift animation CAEmmiterLayer SwiftUI Estimated reading time: 12 minutesCreating an application is not only provided needed functionality for the user but also making something beautiful, something that can bring esthetic pleasure to the person who uses the app, to u, as a developer.
I love to code and to solve some challenges, I love to create good animations that represent the app’s nature.
I always try to provide 101% of expectation, where 1% (at minimum) it’s an effort that can improve some things in the app, often it’s additional animation that brings life into the app.
This idea (to provide 101%) is not mine, I read about it somewhere (shame on me - I forgot where).
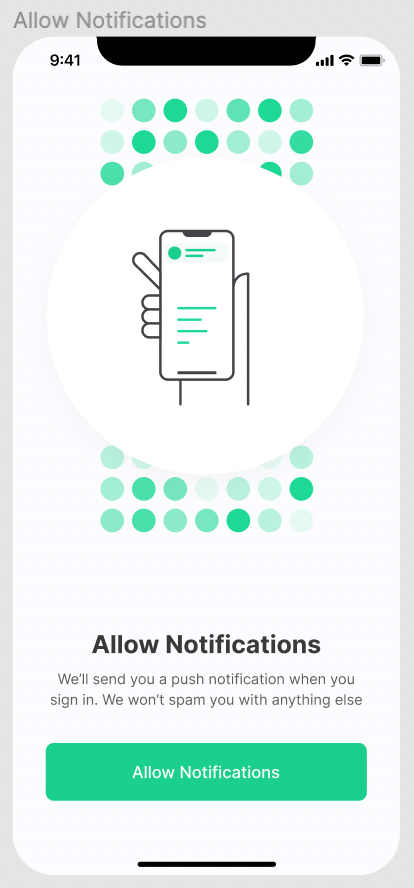
case #1 - welcome
Here is the welcome screen for one of the apps that I faced recently.

I removed the logo (replaced with 2 green circles) and changed messages on the screen, but the rest is the same.
The idea behind this screen is just simple - to introduce the app to the user. We can simply implement this screen using an image for bg and few other elements that result in the exact expected picture.
But, as for me, I tried to make it better - what if we can make these green dots movable, and shadow - the one that can pulse…
To do so, we have a lot of tools available in our toolkit (thanks to Apple).
We can use CAEmmiterLayer from CoreAnimation (QuartzCore) framework.
Thus we have a circle, the configuration of such emitter will be very simple - we just need to set emitter type to circle and configure a few params for CAEmitterCell:
  let cell = CAEmitterCell()

  cell.birthRate = expectedBirthRate
  cell.lifetime = 6.0
  cell.velocity = 30
  cell.velocityRange = cell.velocity / 2
  cell.emissionRange = .pi * 2
  cell.spinRange = .pi
  cell.scaleRange = 0.8
  cell.scale = 1.0 - cell.scaleRange
  cell.contents = content.image.cgImage
To make code highly reusable it’s better to configure the input components for this emitter. I found a great article some time ago about CAEmmiterLayer from Matt available here. So I decided to reuse the content definition introduced there.
Thus we are now able to use SwiftUI, we can also try to wrap the UIView with sublayer and emitter.
ParticleView code
public struct ParticleView: View {

  public enum Content {
    public enum Shape {
      case circle
      case triangle
      case square
      case custom(CGPath)

      func path(in rect: CGRect) -> CGPath {
        switch self {
          case .circle:
            return CGPath(ellipseIn: rect, transform: nil)
          case .triangle:
            let path = CGMutablePath()
            path.addLines(between: [
              CGPoint(x: rect.midX, y: 0),
              CGPoint(x: rect.maxX, y: rect.maxY),
              CGPoint(x: rect.minX, y: rect.maxY),
              CGPoint(x: rect.midX, y: 0)
            ])

            return path
          case .square:
            return CGPath(rect: rect, transform: nil)
          case .custom(let path):
            return path
        }
      }

      func image(with color: UIColor) -> UIImage {
        let rect = CGRect(origin: .zero, size: CGSize(width: 12.0, height: 12.0))
        return UIGraphicsImageRenderer(size: rect.size).image { context in
          context.cgContext.setFillColor(color.cgColor)
          context.cgContext.addPath(path(in: rect))
          context.cgContext.fillPath()
        }
      }
    }

    case shape(Shape, Color)
    case image(UIImage, Color)

    var color: UIColor? {
      switch self {
        case let .image(_, color),
          let .shape(_, color):
          return UIColor(color)
      }
    }

    var image: UIImage {
      switch self {
        case let .shape(shape, _):
          return shape.image(with: .white)
        case let .image(image, _):
          return image
      }
    }
  }

  final class ParticleEmmiterLayer: CAEmitterLayer {

    func configure(_ content: [ParticleView.Content]) {

      let expectedBirthRate: Float = 150.0 / Float(content.count)

      emitterCells = content
        .map { content in
          let cell = CAEmitterCell()

          cell.birthRate = expectedBirthRate
          cell.lifetime = 6.0
          cell.velocity = 30
          cell.velocityRange = cell.velocity / 2
          cell.emissionRange = .pi * 2
          cell.spinRange = .pi
          cell.scaleRange = 0.8
          cell.scale = 1.0 - cell.scaleRange
          cell.contents = content.image.cgImage

          if let color = content.color {
            cell.color = color.cgColor
          }
          cell.alphaRange = 1

          return cell
        }
    }

    override func layoutSublayers() {
      super.layoutSublayers()

      emitterShape = .circle
      emitterSize = CGSize(
        width: frame.size.width * 0.5,
        height: frame.size.width * 0.5
      )
      emitterPosition = CGPoint(
        x: frame.size.width / 2.0,
        y: frame.size.height / 2.0
      )
    }
  }

  final class EmmiterView: UIView {

    public init() {
      super.init(frame: .zero)

      commonInit()
    }

    public required init?(coder aDecoder: NSCoder) {
      super.init(coder: aDecoder)

      commonInit()
    }

    private func commonInit() {
      isUserInteractionEnabled = false
    }

    override public func willMove(toSuperview newSuperview: UIView?) {
      guard let superview = newSuperview else {
        self.layer.removeAllAnimations()
        return
      }

      frame = superview.bounds
      isUserInteractionEnabled = false
    }

    public func emit(with contents: [ParticleView.Content]) {
      let layer = ParticleEmmiterLayer()
      layer.configure(contents)
      layer.frame = self.bounds
      layer.needsDisplayOnBoundsChange = true

      layer.beginTime = CACurrentMediaTime()
      self.layer.addSublayer(layer)
    }
  }

  struct ParticleViewRaw: UIViewRepresentable {

    func makeUIView(context: Context) -> some UIView {
      let view = EmmiterView()
      view.frame = CGRect(origin: .zero, size: frame)
      view.setNeedsLayout()
      view.layoutIfNeeded()
      view.emit(with: content)
      return view
    }

    let content: [ParticleView.Content]
    let frame: CGSize

    func updateUIView(_ uiView: UIViewType, context: Context) { /*nothing to do*/ }
  }

  let content: [ParticleView.Content]

  public init(content: [ParticleView.Content]) {
    self.content = content
  }

  public var body: some View {
    GeometryReader { proxy in
      ParticleViewRaw(content: content, frame: proxy.size)
        .frame(width: proxy.size.width, height: proxy.size.height)
    }
  }
}
The interesting part is what we can get using this layer:

Now, we need to add pulse animation for the logo placeholder.
To do so, I used old good CABasicAnimation - we can create a circle and animate the radius of the circle, its width, and opacity. Putting a few such animations one on another we can get a pulse effect - like a water drop.
The code for animation is very simple:
    private func pathAnimation() -> CABasicAnimation? {
      let resizeAnimation = CABasicAnimation(keyPath: "path")
      let viewWidth = frame.size.width * 2
      resizeAnimation.fromValue = UIBezierPath(
        ovalIn: CGRect(
          x: frame.size.width / 2.0,
          y: frame.size.height / 2.0,
          width: 0,
          height: 0
        )
      ).cgPath
      resizeAnimation.toValue = UIBezierPath(
        ovalIn: CGRect(
          x: (frame.size.width - viewWidth) / 2.0,
          y: (frame.size.height - viewWidth) / 2.0,
          width: viewWidth,
          height: viewWidth
        )
      ).cgPath
      return resizeAnimation
    }

    private func opacityAnimation() -> CABasicAnimation? {
      let opacityAnimation = CABasicAnimation(keyPath: "opacity")
      opacityAnimation.fromValue = 0.1
      opacityAnimation.toValue = 0.0
      return opacityAnimation
    }

    private func lineWidthAnimation() -> CABasicAnimation? {
      let lineWidthAnimation = CABasicAnimation(keyPath: "lineWidth")
      lineWidthAnimation.fromValue = frame.size.width
      lineWidthAnimation.toValue = frame.size.width / 2
      return lineWidthAnimation
    }
  }
Full code for PulsarView
public struct PulsarView: View {
  final class PulseAnimationView: UIView {

    private enum Constants {

      static let animationDuration: CFTimeInterval = 6
      static let ringsQuantity = 3
    }

    override public func willMove(toSuperview newSuperview: UIView?) {
      guard let superview = newSuperview else {
        self.layer.removeAllAnimations()
        return
      }

      frame = superview.bounds
      isUserInteractionEnabled = false
    }

      // MARK: - Public

    func createPulseAnimation(
      with ringColor: UIColor,
      repeatCount: Float = .infinity
    ) {
      let currentTime: CFTimeInterval = CACurrentMediaTime()

      for ringNumber in 0..<Constants.ringsQuantity {
        let shapeLayer = CAShapeLayer()
        shapeLayer.frame = bounds
        shapeLayer.strokeColor = ringColor.cgColor
        shapeLayer.fillColor = UIColor.clear.cgColor
        layer.insertSublayer(shapeLayer, at: 0)

        let resizeAnimation: CABasicAnimation? = pathAnimation()
        let opacityAnimation: CABasicAnimation? = opacityAnimation()
        let lineWidthAnimation: CABasicAnimation? = lineWidthAnimation()
        let group = CAAnimationGroup()

        group.duration = Constants.animationDuration
        group.beginTime = CFTimeInterval(
          currentTime
          + (Constants.animationDuration / CFTimeInterval(Constants.ringsQuantity)) * Double(ringNumber) / 2
        )
        group.autoreverses = false
        group.repeatCount = repeatCount
        group.animations = [
          resizeAnimation as CAAnimation?,
          opacityAnimation as CAAnimation?,
          lineWidthAnimation as CAAnimation?
        ]
          .compactMap({ $0 })
        shapeLayer.add(group, forKey: "circleAnimations")
      }
    }

      // MARK: - Private

    private func pathAnimation() -> CABasicAnimation? {
      let resizeAnimation = CABasicAnimation(keyPath: "path")
      let viewWidth = frame.size.width * 2
      resizeAnimation.fromValue = UIBezierPath(
        ovalIn: CGRect(
          x: frame.size.width / 2.0,
          y: frame.size.height / 2.0,
          width: 0,
          height: 0
        )
      ).cgPath
      resizeAnimation.toValue = UIBezierPath(
        ovalIn: CGRect(
          x: (frame.size.width - viewWidth) / 2.0,
          y: (frame.size.height - viewWidth) / 2.0,
          width: viewWidth,
          height: viewWidth
        )
      ).cgPath
      return resizeAnimation
    }

    private func opacityAnimation() -> CABasicAnimation? {
      let opacityAnimation = CABasicAnimation(keyPath: "opacity")
      opacityAnimation.fromValue = 0.1
      opacityAnimation.toValue = 0.0
      return opacityAnimation
    }

    private func lineWidthAnimation() -> CABasicAnimation? {
      let lineWidthAnimation = CABasicAnimation(keyPath: "lineWidth")
      lineWidthAnimation.fromValue = frame.size.width
      lineWidthAnimation.toValue = frame.size.width / 2
      return lineWidthAnimation
    }
  }

  struct PulsarViewRaw: UIViewRepresentable {

    let color: Color
    let frame: CGSize

    func makeUIView(context: Context) -> some PulseAnimationView {
      let view = PulseAnimationView()
      view.frame = CGRect(origin: .zero, size: frame)
      view.setNeedsLayout()
      view.layoutIfNeeded()
      view.createPulseAnimation(with: .init(color))
      return view
    }

    func updateUIView(_ uiView: UIViewType, context: Context) { /*nothing to do*/ }
  }

    // MARK: - PulsarView

  public init(color: Color) {
    self.color = color
  }

  public let color: Color

  @State var shouldRedraw: Bool = false

  public var body: some View {
    GeometryReader { proxy in
      // fix issue with appear/dissapear view and relaunch basic animation
      if shouldRedraw {
        PulsarViewRaw(color: color, frame: proxy.size)
          .frame(width: proxy.size.width, height: proxy.size.height)
      }
    }
    .onAppear {
      shouldRedraw = true
    }
    .onDisappear {
      shouldRedraw = false
    }
  }
}
And now, combining this animation with previous one:
Even better - we can add an animated effect on button press - like scale and opacity. This makes the screen even more alive.
case #2 - camera
Another good example - camera screen. One of the most popular designs for this screen - its dimmed view with a hole at the center and square/rounded corners.
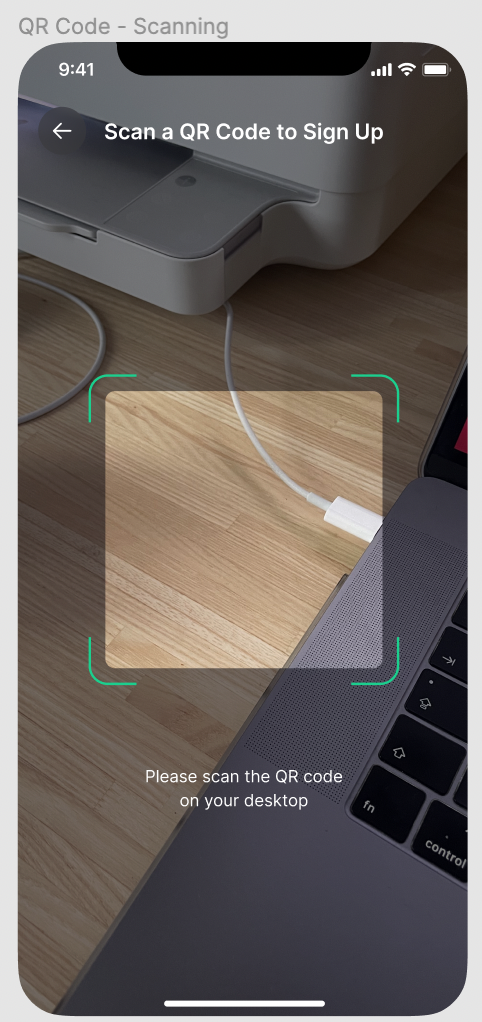
That’s normal, but we can make a feeling of active action on the screen by adding some scan indicators.
With SwiftUI this can be done within a few lines of code:
  struct ScanLineAnimationView: View {

    let frame: CGSize
    let topOffset: CGFloat
    let lineColor: Color
    let gradient: [Color]

    @State private var offset: CGFloat = 0

    var body: some View {

      VStack(spacing: 0) {
        Rectangle()
          .fill(Color.clear)
          .frame(height: topOffset)
        VStack(spacing: 0) {
          Rectangle()
            .fill(lineColor)
            .frame(height: 2)
            .background(
              LinearGradient(
                colors: gradient,
                startPoint: .top,
                endPoint: .bottom
              )
                .frame(height: 100)
                .padding(.horizontal, 10)
            )
            .offset(y: offset)
            .foreverAnimation {
              offset = frame.height
            }

          Spacer()
        }
        .frame(width: frame.width, height: frame.height)

        Spacer()
      }
    }
  }
This view will move content - rectangle (a line) over and over ap and down, simulating the scan process (like on a real scanner). In addition, some gradients were added to the line - to simulate light.
foreverAnimationit’s an extension that repat some animation infinitely
import Foundation
import SwiftUI

public extension View {
  func foreverAnimation(
    _ animation: @escaping () -> Void,
    duration: TimeInterval = 1
  ) -> some View {
    onAppear {
      withAnimation(
        Animation
          .easeInOut(duration: duration)
          .repeatForever(autoreverses: true)
      ) {
        animation()
      }
    }
  }
}
The most interesting part is what we can get using this:
case #3 - background
Sometimes we can see the opportunity even on secondary elements - like on the background.
Here is a good example:
From the very first look, I saw a screen that have an animated background (circles).
To do so, we can start from simple view that animate some shape:
struct AnimatedCircle: View {
  let duration: TimeInterval
  let initialColor: Color
  let targetColor: Color

  @State var flag: Bool = false

  var body: some View {
    AnimatableCircle(
      fromColor: initialColor,
      toColor: targetColor,
      percentage: flag ? 1 : 0.1
    )
      .onAppear(perform: {
       //  if u put this view without explicit animation in
       //  NavigationView u will see also frame change animation, that is a bug
       //
       //  workaround to use explicit animation only on current view
       //  https:developer.apple.com/forums/thread/670836
        DispatchQueue.main.async {
         withAnimation(
            .easeInOut(
              duration: duration)
              .repeatForever(autoreverses: true)
              .delay(.random(in: 0.5...duration))
          ) {
            self.flag.toggle()
          }
        }
      })
  }
}
Alternative Animated View with UIKit
struct AnimatedShapeView: View {
  final class AnimatableShapeView: UIView {
    private let shapeLayer = CAShapeLayer()
    private var persistentAnimations: [String: CAAnimation] = [:]
    private var persistentSpeed: Float = 0.0

    public init() {
      super.init(frame: .zero)

      commonInit()
    }

    public required init?(coder aDecoder: NSCoder) {
      super.init(coder: aDecoder)

      commonInit()
    }

    func commonInit() {
      isUserInteractionEnabled = false

      layer.addSublayer(shapeLayer)

      NotificationCenter.default.addObserver(
        self,
        selector: #selector(didBecomeActive),
        name: UIApplication.willEnterForegroundNotification,
        object: nil
      )
      NotificationCenter.default.addObserver(
        self,
        selector: #selector(willResignActive),
        name: UIApplication.didEnterBackgroundNotification,
        object: nil
      )
    }

    deinit {
      NotificationCenter.default.removeObserver(self)
    }

    override public func willMove(toSuperview newSuperview: UIView?) {
      guard let superview = newSuperview else {
        self.layer.removeAllAnimations()
        return
      }

      frame = superview.bounds
      isUserInteractionEnabled = false
    }

    override func layoutSubviews() {
      super.layoutSubviews()

      let sideSize = min(bounds.size.width, bounds.size.height) * 0.75
      let originX = (bounds.width - sideSize) / 2.0
      let originY = (bounds.height - sideSize) / 2.0

      shapeLayer.frame = CGRect(x: originX, y: originY, width: sideSize, height: sideSize)
      shapeLayer.path = UIBezierPath(ovalIn: shapeLayer.bounds).cgPath

    }

    func animate(_ fromColor: Color, toColor: Color, duration: TimeInterval) {
      let animColor = CABasicAnimation(keyPath: "fillColor")
      animColor.fromValue = UIColor(fromColor).cgColor
      animColor.toValue = UIColor(toColor).cgColor
      animColor.duration = duration
      animColor.beginTime = .random(in: 0.5...duration)
      animColor.repeatCount = .greatestFiniteMagnitude
      animColor.autoreverses = true
      shapeLayer.add(animColor, forKey: "fillColor")
    }

    @objc private func didBecomeActive() {
      self.restoreAnimations(withKeys: Array(self.persistentAnimations.keys))
      self.persistentAnimations.removeAll()
      if self.persistentSpeed == 1.0 {
        self.shapeLayer.resume()
      }
    }

    @objc private func willResignActive() {
      self.persistentSpeed = self.shapeLayer.speed

      self.shapeLayer.speed = 1.0
      self.persistAnimations(withKeys: self.shapeLayer.animationKeys())
      self.shapeLayer.speed = self.persistentSpeed

      self.shapeLayer.pause()
    }

    private func persistAnimations(withKeys: [String]?) {
      withKeys?.forEach({ (key) in
        if let animation = self.shapeLayer.animation(forKey: key) {
          self.persistentAnimations[key] = animation
        }
      })
    }

    private func restoreAnimations(withKeys: [String]?) {
      withKeys?.forEach { key in
        if let persistentAnimation = self.persistentAnimations[key] {
          self.shapeLayer.add(persistentAnimation, forKey: key)
        }
      }
    }
  }

  struct AnimatedShapeViewRaw: UIViewRepresentable {
    let fromColor: Color
    let toColor: Color
    let frame: CGSize
    let duration: TimeInterval

    func makeUIView(context: Context) -> AnimatableShapeView {
      let view = AnimatableShapeView()
      view.frame = CGRect(origin: .zero, size: frame)
      view.setNeedsLayout()
      view.layoutIfNeeded()
      return view
    }

    func updateUIView(_ uiView: AnimatableShapeView, context: Context) {
      uiView.animate(fromColor, toColor: toColor, duration: duration)
    }
  }

  let fromColor: Color
  let toColor: Color
  let duration: TimeInterval

  public var body: some View {
    GeometryReader { proxy in
      AnimatedShapeViewRaw(fromColor: fromColor, toColor: toColor, frame: proxy.size, duration: duration)
        .frame(width: proxy.size.width, height: proxy.size.height)
    }
  }
}
The next step - is to combine a set of view’s and animate them randomly from a given set of colors:
struct AnimatedBackgroundView: View {
  let animatedColors: [Color]

  var body: some View {
    VStack(spacing: 0) {
      ForEach(0..<10, id: \.self) { _ in
        HStack(spacing: 0) {
          ForEach(0..<7, id: \.self) { _ in
            let color = animatedColors.randomElement()
                          ?? animatedColors[animatedColors.indices.lowerBound]

            AnimatedCircle(
              duration: .random(in: 1.5...5.0),
              initialColor: color,
              targetColor: color.opacity(0.1)
            )
          }
        }
      }
    }
  }
}
The result:
To make things even better, we can talk to the designer and ask him to prepare some animated image - gif/video or u can use some 3rd party providers like Lottie.
How to use gif in iOS - checkout my article here

Conclusion
This list can be extended for hundreds of more items. But, as u can see, every screen has an opportunity to obtain improvement and u can improve u’r skills.
Even single addition makes u’r work more remarkable. Try it, and u will see the result.
Resources
Share on: