My first android animation
android animation kotlin Estimated reading time: 7 minutesI love animations. I do them a lot within the iOS system. But recently I have faced with Android system, where I need to implement the same animation as I did for iOS.
Previously I already describe a few ways how to do nice animation in iOS in this post.
Another posts regarding animations can be fond here and here.
problem
What needs to be done - animation of bubbles for logo. I already did this for iOS project, and this looks like next:
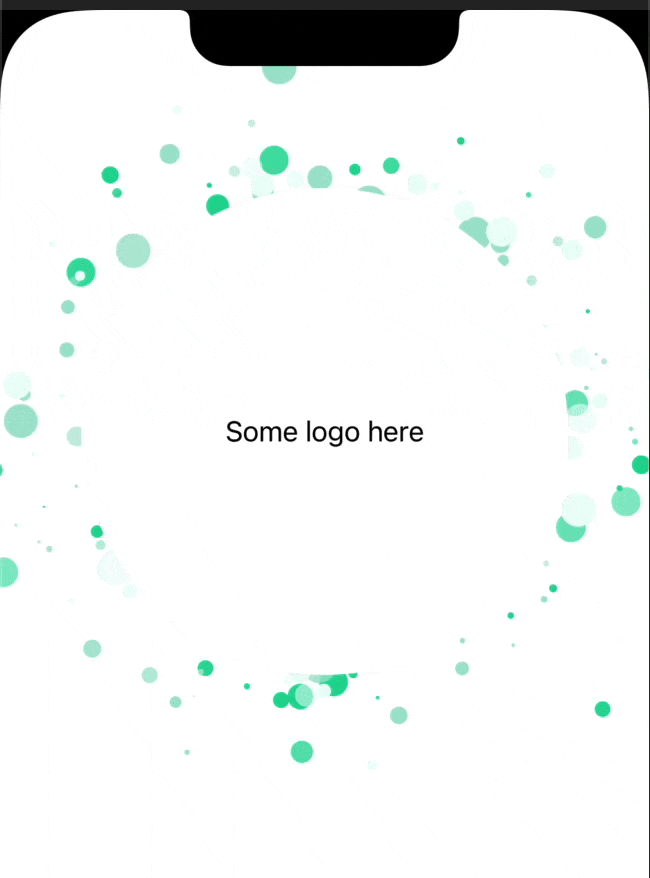
the post that describe how to do this available here.
With iOS, this can be easily achieved using CAEmmiterLayer. With android, where I a new guy - I don’t know ;].
Below, I described my experience with this adventure. Of cause I am not sure if this is the best way we can achieve this (probably not).
solution
I read a bit about an alternative to CAEmmiterLayer and found nothing -[ .
I found, that we can draw something on Canvas using a lot of fucntions with simple actions - drawArc(RectF oval, float startAngle, float sweepAngle, boolean useCenter, Paint paint) or drawCircle(float cx, float cy, float radius, Paint paint) - exactly what I need.
I start looking for a way how I can create some canvas and make a draw in a way I need. The idea was to draw each second image and redraw the updated position of points with specific modifications (color or opacity). As result, found a very interesting book (to be honest I like books more than some videos or other resources) - Android Programming with Kotlin for Beginners by John Horton.
In this book, I found a chapter, where the author describes particle effect and drawing on Canvas - exactly what I need.
To be more specific - Chapter 22 - Particle Systems and Handling Screen Touches
The idea is very simple - create a system that describes particles and combine a few systems into one drawing mechanism that can update itself over time and so mimic particle effect (aka CAEmmiterLayer).
The downside is obvious - with too many drawings u drain the battery because u load the CPU (Canvas drawing - CPU based - like CoreGraphics on iOS).
The whole story begins from model for our particle machine - we need to define the Particle itself to be able to describe some properties of each drawing part:
class Particle(direction: PointF, hexColor: String) {
    private var velocity: PointF = PointF()
    var position: PointF = PointF()
    var alpha = 255
    var color: Int = 0
    var size: Float = 0f
    private val random = Random()
    private var duration = Random().nextInt(60).toFloat()

    init {
        velocity.x = direction.x
        velocity.y = direction.y

        color = Color.parseColor(hexColor)
        size = random.nextInt(30).toFloat()
    }

    fun update(fps: Long) {
        duration -= 1f / fps

        position.x += velocity.x
        position.y += velocity.y

        if (alpha > 0) {
            alpha -= 1
        }
    }
}
Here u can see a lot of props that describe the behavior of particles and also functions that can modify them with time. I put full solution code here - the idea behind it: we have a model that describes the particle and mutates over time: change its coordinate and alpha.
Simple solution for coordinate change - linear change, with the random seed we can make its movement more unpredictable.
Next component - the ParticleSystem: holds particle and redraw everything on update:
class ParticleSystem() {
    private var particles: ArrayList<Particle> = ArrayList()
    private val random = Random()

    fun initParticles(numParticles: Int, hexColors: List<String>) {
        for (i in 0 until numParticles) {
            var angle: Double = random.nextInt(360).toDouble()
            angle *= (3.14/180)
            val speed = random.nextFloat() * random.nextInt(5)
            val direction = PointF(
                cos(angle).toFloat() * speed,
                sin(angle).toFloat() * speed
            )

            particles.add(Particle(direction, hexColors.random()))
        }
    }

    fun update(fps: Long) {
        for(p in particles) {
            p.update(fps)
        }
    }

    fun emitParticles(startPosition: PointF) {
        for (p in particles) {
            p.position.x = startPosition.x
            p.position.y = startPosition.y
            p.alpha = 255
        }
    }

    fun draw(canvas: Canvas) {
        for (p in particles) {

            val paint = Paint()
            paint.color = Color.argb(
                p.alpha,
                p.color.red,
                p.color.green,
                p.color.blue
            )

            if (
                abs(p.position.x) < canvas.width ||
                abs(p.position.y) < canvas.height
            ) {
                canvas.drawCircle(
                    p.position.x,
                    p.position.y,
                    p.size,
                    paint
                )
            }
        }
    }
}
The most interesting part here - is the init function and draw function - places where we configure directions, amount, intensity, and logic for drawing.
Another moment - update(fps: Long) function, used to modify each particle.
As u can see, this system doesn’t have any drive component - so full control of updates will be done outside.
The last component - is the place where we can draw and the engine that can drive updates for us.
Selected option - SurfaceView - allow for drawing by Canvas in a separate thread DrawerThread with lockCanvas() and unlockCanvasAndPost().
Within Runnable protocol we can override the run function and receive a perfect update callback for all the systems, optimized for this.
All that needs to do now is next:
- create and populate particle system (to be able to replace the one that draws particle path from start to the end and re-start it)
- add callbacks to
resume/pausedrawing process - override
runwith logic to perform draw activities - optionally provide some info about performance
class LiveEmiterView(
context: Context,
offsetY: Float = 124f,
hexColors: List<String>
) : SurfaceView(context), Runnable {
private val debugging = false
private lateinit var canvas: Canvas
private val paint: Paint = Paint()
private var fps: Long = 0
private val millisInSecond: Long = 1000
private val particleSystems = ArrayList<ParticleSystem>()
private var offsetY: Float = 0f
private var nextSystem = 0
private val maxSystems = 10
private val particlesPerSystem = 200
private lateinit var thread: Thread
@Volatile
private var drawing: Boolean = true
private var captureTime: Long = 0
private var requireFullCycleRedraw: Boolean = false
init {
this.offsetY = offsetY
for (i in 0 until maxSystems) {
particleSystems.add(ParticleSystem())
particleSystems[i].initParticles(particlesPerSystem, hexColors)
}
captureTime = System.currentTimeMillis()
}
fun pause() {
drawing = false
try {
thread.join()
} catch (e: InterruptedException) {
Log.e("Error:", "joining thread")
}
}
fun resume() {
drawing = true
thread = Thread(this)
thread.start()
}
override fun run() {
while (drawing) {
val frameStartTime = System.currentTimeMillis()
update()
draw()
val timeThisFrame = System.currentTimeMillis() - frameStartTime
if (timeThisFrame > 0) {
fps = millisInSecond / timeThisFrame
}
val sideSize = this.width / 2
val yPosition = offsetY + sideSize
particleSystems[nextSystem].emitParticles(
PointF(this.width / 2f, yPosition)
)
val timeInterval = 1000
if (frameStartTime - captureTime > timeInterval) {
captureTime = frameStartTime
nextSystem++
if (nextSystem == maxSystems) {
requireFullCycleRedraw = true
nextSystem = 0
captureTime -= timeInterval
}
}
}
}
private fun draw() {
if (holder.surface.isValid) {
canvas = holder.lockCanvas()
canvas.drawColor(Color.argb(255, 255, 255, 255))
paint.color = Color.argb(255, 142, 122, 22)
paint.textSize = 48f
val targetSystemId: Int = if (requireFullCycleRedraw) maxSystems else nextSystem
for (i in 0 until targetSystemId) {
particleSystems[i].draw(canvas)
}
if (debugging) {
printDebuggingText()
}
holder.unlockCanvasAndPost(canvas)
}
}
private fun update() {
for (i in 0 until particleSystems.size) {
particleSystems[i].update(fps)
}
}
private fun printDebuggingText() {
val debugSize = paint.textSize
val debugStart = 150
paint.textSize = debugSize
canvas.drawText(
"fps: $fps",
10f, (debugStart + debugSize),
paint
)
canvas.drawText(
"Systems: $nextSystem",
10f, (32 + debugStart + debugSize * 2),
paint
)
canvas.drawText(
"Particles: ${nextSystem * particlesPerSystem}",
10f, (32 + debugStart + debugSize * 3),
paint
)
}
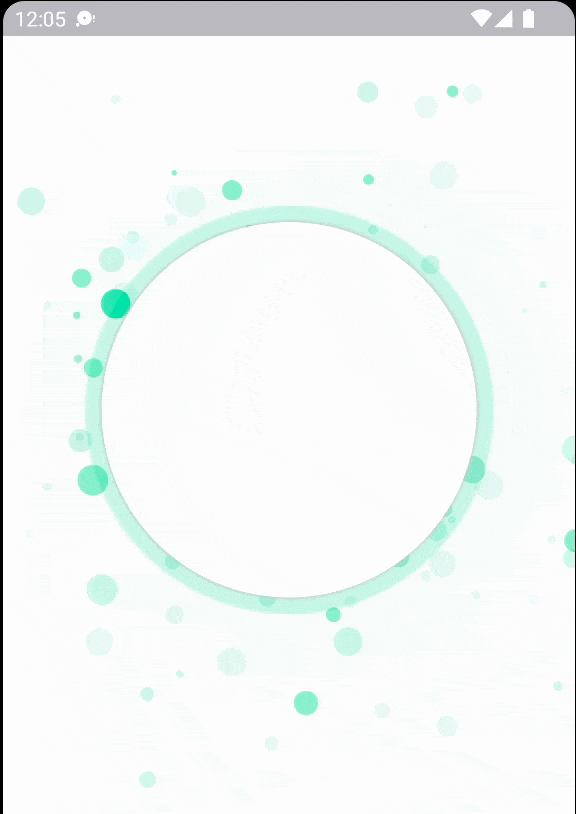
}This is only a particle system. To achieve a circle with shadow and logo at the center we can create fragments and put in Z-order all of these components.
The result is next:
conclusion
The big problem on my side - is that I start thinking about another ecosystem in an iOS way. That’s wrong - always try to view things from another point. That’s the key.
resources
Share on: